February 6, 2010

Debugging Team Build with MSBuild Sidekick

Filed under: MSBuild Sidekick,tfs,Uncategorized — Tags: , , — nikolays @ 1:00 pm

MSBuild is powerful general purpose build engine, but what if you have a dedicated build server running Team Foundation Server Build? Did you know that you can execute Team Build projects locally and even debug them with MSBuild Sidekick? In this post we shall show how to do that in three simple steps (for Visual Studio Team Foundation Server 2008).

Prior to debugging you need to know about several limitations desktop build has comparing to Team build running on the server. From MSDN article "How to: Build Team Projects on a Desktop":

  • The desktop builds perform only the compilation and tests.
  • They do not perform other public build steps such as getting sources from version control, updating work items, labeling sources, creating new work items, and copying to drop locations
  • The default MSBuild logger logs the results because the Team Foundation Build logger is not enabled for desktop builds.
  • The desktop builds do not store build data in the database.
  • They do not generate any status reports. Build output is written to console. You can learn more details by enabling the Verbosity option when running the MSBuild command. For more information, see MSBuild Command Line Reference.

1. Follow the directions in the article to get you all prerequisites for building Team Build projects locally in order.

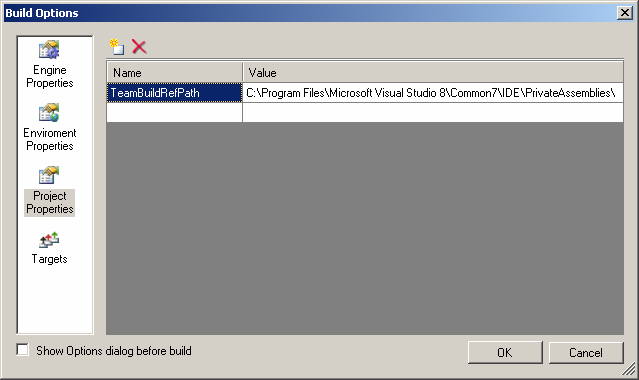
2. Open local copy of Team Build project file from previous step with MSBuild Sidekick and define TeamBuildRefPath property in "Project Properties" pane. To do so access "Build" -> "Build Options" menu item, and then click "Project Properties" icon at the left pane and add TeamBuildRefPath property with its value set to "C:\Program Files\Microsoft Visual Studio 8\Common7\IDE\PrivateAssemblies\" (or different drive where you have VS 2008 installed).

Project Properties

Reload project by clicking "File" -> "Reload". A few warnings you still see do not affect further debugging.

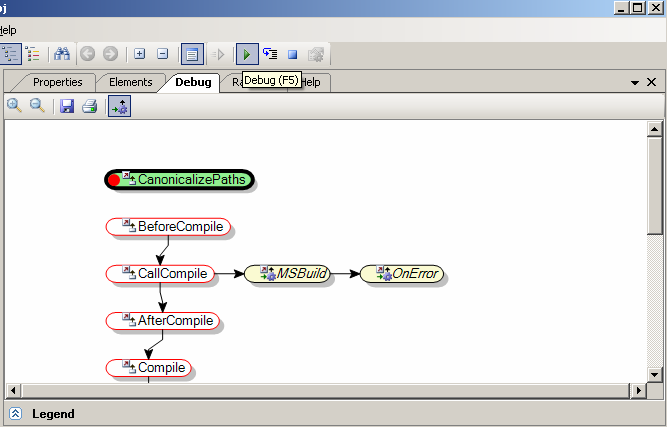
3. Your Team Build project is now ready for debugging. You may start debugging by clicking Debug toolbar button or pressing F5 key.

Debug  Window

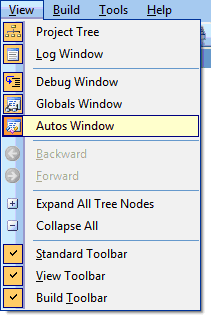
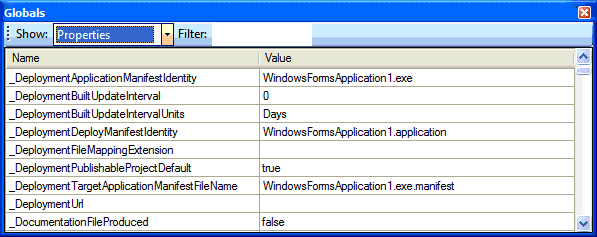
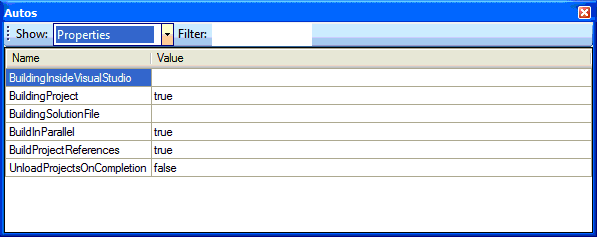
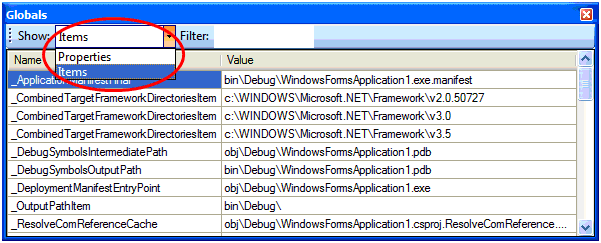
You can learn more about debugging and how to use it efficiently from our previous posts “How to debug step-by-step with MSBuild Sidekick” and “How to review Properties & Items while debugging with MSBuild Sidekick”.

January 27, 2010

MSBuild Sidekick v3 Beta is available!

Filed under: 2010,MSBuild Sidekick,Visual Studio — Tags: , , — nikolays @ 2:21 pm

We are happy to announce a release of MSBuild Sidekick v3, supporting full range of MSBuild versions from 2.0 to 4.0. Using v3, you will be able to experiment with new MSBuild features available in .Net 4.0 Beta 2 and Visual Studio 2010 Beta 2.

Download and try this new version right now! You don’t need to uninstall previous MSBuild Sidekick version, and no license is required for the beta (the beta expires on 01 May 2010). Runtime .Net 4.0 Beta 2 is required.

It’d be great if you email us about your user experience, found bugs and new feature requests. Final version MSBuild Sidekick v3 will be released after Visual Studio 2010 RTM.

May 15, 2009

How to review Properties & Items while debugging with MSBuild Sidekick

Filed under: MSBuild Sidekick — Tags: , , , — nikolays @ 8:27 am

In the recent post we described the basics of debugging typical MSBuild project.

In this post we shall touch upon important feature of MSBuild Sidekick debugger – namely inspecting Property and Item values during debugging with Globals and Autos windows.

The walkthrough below will show how to review Property and Item values while debugging:

1. Start debugging project in step-by-step mode (see previous post)

2. When Target/Task is selected (highlighted with bold border in Debug window) click on View > Globals Window and View > Autos Window menu.

View main menu

Globals and Autos windows will appear at bottom pane of main application window.
Note: you may simply change these windows position by dragging-and-dropping them anywhere on application window.

Globals window displays Property and Item values as they are evaluated during the build execution.

Globals window

Autos window is similar to Globals window but displays only Properties/Items that are defined as input or output parameters for Target/Task element to be executed at the next step as you step through the project.

Autos window

3. Now let’s review the data. One can use Show combo box to switch between Properties and Items view mode.
Data is organized as a table with the following columns:
* Property/Item name
* Property/Item current value

Globals window - dropdown

4. You may also use Filter text box to filter currently visible elements based on element name.

Globals window - filter

5. As you click on "Debug Step" button and debug step-by-step you may see that Properties/Items that have been changed on previous step are highlighted in red.

Globals window - highlighted properties

April 8, 2009

How to use MSBuild Extension Pack tasks with MSBuild Sidekick

Filed under: MSBuild Sidekick — Tags: , — nikolays @ 12:37 pm

One of the most exciting and widely accepted projects in MSBuild community is MSBuild Extension Pack tasks. MSBuild Extension pack provides a collection of over 240 MSBuild tasks you may use in your MSBuild projects for free!

In MSBuild Sidekick v 2.3 we introduced integration with MSBuild Extension Pack tasks; now you can add, edit properties and view online help for all the MSBuild Extension Pack tasks in the Sidekick application.

To illustrate these features let’s create new MSBuild project in MSBuild Sidekick v2.3 and add a MSBuild Extension Pack task to it.

Note: you should have MSBuild Extension Pack properly installed; it is available at http://www.codeplex.com/MSBuildExtensionPack.

1. Right click on Target element and choose "Add Task" from context menu.

Task context menu

2. In the "Add Task" dialog choose "Custom Tasks" tab – you should see there all the MSBuild Extension Pack task classes.

Add Task dialog

3. Then click on task class you’re going to use in your project, click "Add" button and click "Close" to leave dialog window.
Note: you can add multiple tasks using "Add Task" dialog by clicking "Add" button multiple times.

Add Task dialog buttons

4. Choose relevant task action in TaskAction property drop-down for your new task.

TaskAction property dropdown

5. Once task action is selected, the task parameters list will be filtered automatically, so that only task parameters relevant for the selected task action will be displayed. Required input parameters will be marked with asterisk (see Format parameter on the screenshot above).

6. To view online help for the selected MSBuild Extension Pack task navigate to Help window.

Task element online help


© 2006-2008 Attrice Corporation. Last updated 06-Mar-2009 Contact us